兰空图床Lsky Pro增加AWS S3/Minio支持

兰空图床是一款简单而强大的图床程序,但是目前并不支持minio/s3存储策略,作者计划在2.0版本开发此功能。

然而我不想等了,决定略写几行代码,以支持自建minio后端。有需要的看官可以参考。

大约如下几步:

一、撰写AWS S3存储driver,放到extend/strategy/driver/ 目录下:

<?php

namespace strategy\driver;

use strategy\Driver;

if (!function_exists('exif_imagetype')) {
    function exif_imagetype($filename)
    {
        if ((list($width, $height, $type, $attr) = getimagesize($filename)) !== false) {
            return $type;
        }
        return false;
    }
}

/**
 * Aws储存驱动
 *
 * Class Aws
 * @package strategy\driver
 */
class Aws implements Driver
{
    /**
     * 当前储存策略参数
     *
     * @var array
     */
    protected $options = [];

    /**
     * 错误信息
     *
     * @var null
     */
    protected $error = null;

    /**
     * Aws实例
     *
     * @var null
     */
    protected $s3 = null;

    /**
     * Aws constructor.
     *
     * @param array $options
     */
    public function __construct($options = [])
    {
        $this->options = $options;
        try {
            $this->s3 = new \Aws\S3\S3Client([
                'version' => 'latest',
                'region'  => empty($this->options['s3_region']) ? 'us-east-1' : $this->options['s3_region'],
                'endpoint' => $this->options['s3_endpoint'],
                'use_path_style_endpoint' => true,
                'credentials' => [
                    'key'    => $this->options['s3_key'],
                    'secret' => $this->options['s3_secret'],
                ],
            ]);
        } catch (\Exception $e) {
            $this->error = $e->getMessage();
        }
    }

    /**
     * 创建文件
     *
     * @param $pathname
     * @param $file
     *
     * @return bool
     */
    public function create($pathname, $file)
    {
        try {
            $params = array(
                'Bucket' => $this->options['s3_bucket'],
                'Key' => $pathname,
                'Body' => fopen($file, 'rb')
            );
            if ($image_type = exif_imagetype($file)) {
                $params['ContentType'] = image_type_to_mime_type($image_type);
            }

            $this->s3->putObject($params);
        } catch (\Exception $e) {
            $this->error = $e->getMessage();
            return false;
        }

        return true;
    }

    /**
     * 删除文件
     *
     * @param $pathname
     *
     * @return bool
     */
    public function delete($pathname)
    {
        try {
            $this->s3->deleteObject([
                'Bucket' => $this->options['s3_bucket'],
                'Key' => $pathname,
            ]);
        } catch (\Exception $e) {
            $this->error = $e->getMessage();
            return false;
        }

        return true;
    }

    /**
     * 删除多个文件
     *
     * @param array $list
     * @return bool|mixed
     */
    public function deletes(array $list)
    {
        try {
            $objects = [];
            foreach ($list as $value) {
                $objects[] = ['Key' => $value ];
            }
            $this->s3->deleteObjects([
                'Bucket' => $this->options['s3_bucket'],
                'Objects' => $objects,
            ]);
        } catch (\Exception $e) {
            $this->error = $e->getMessage();
            return false;
        }

        return true;
    }

    public function getError()
    {
        return 'Aws:' . $this->error;
    }
}

二、增加aws-sdk-php依赖

composer require aws/aws-sdk-php -n

三、增加存储策略配置,在config/strategy.php 增加一项

'aws'=>['name'=>'AWS S3','class'=>\strategy\driver\Aws::class],

四、执行SQL增加配置参数

INSERT INTO `lsky_config` VALUES (0,'aws','text','text','s3_endpoint','Endpoint',NULL,'',''),(0,'aws','text','text','s3_key','Key',NULL,'',''),(0,'aws','text','text','s3_secret','Secret',NULL,'',''),(0,'aws','text','text','s3_bucket','Bucket','储存桶名称','',''),(0,'aws','text','text','aws_cdn_domain','域名',NULL,'','');
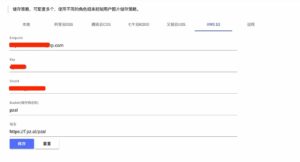
五,在后台设置存储策略,完成


附:构建docker参考脚本 docker.zip

微信小程序Canvas不支持 isPointInPath的解决方案

        近期在做一个贴纸功能,里面需要判断点击坐标是否处于贴纸范围,该贴纸经过了旋转和缩放。html5的canvas支持isPointInPath方法快速判断点击是否属于某多边形区域,但是微信小程序并不支持.

        研究了一番,使用了ray-crossing算法的判断方法如下(在边缘线的也算进去了):

function isPointInPolygon (point, target) {
    const targetSize = target.length;
    let nCross = 0;
    for (let i = 0; i < targetSize; i += 1) {
      const p1 = target[i];
      const p2 = target[(i + 1) % targetSize];

      if (point.y < Math.min(p1.y, p2.y)) continue;
      if (point.y > Math.max(p1.y, p2.y)) continue;

      if (p1.y == p2.y) {
        const minX = Math.min(p1.x, p2.x);
        const maxX = Math.max(p1.x, p2.x);
        if (point.y == p1.y && (point.x >= minX && point.x <= maxX)) {
          return true;
        }
      } else {
        const x = ((point.y - p1.y) * (p2.x - p1.x)) / (p2.y - p1.y) + p1.x;
        if (x == point.x) {
          return true;
        } else if (x > point.x) {
          nCross++;
        }
      }
    }

    return nCross % 2 == 1;
  }

参考文章:https://blog.csdn.net/yanjunmu/article/details/46723407


CentOS 6/7 x86_64更换4.9版本内核,支持Google BBR拥塞控制算法

该脚本内核由本人编译,脚本特点:
1、无需手动修改grub启动项;
2、已经默认设置拥塞算法为BBR,无需额外设置,重启即可用;
3、更新至4.9正式版

OpenVZ的就不要试了,不可用

注意,本人编译的内核bbr不是模块化的,通过lsmod|grep bbr是查不到结果的,fq也是。

安装步骤:

wget -O- http://soft.wellphp.com/scripts/install_bbr_centos.sh | bash

安装结束之后,重启:

reboot

重启之后验证是否已经成功:

sysctl net.ipv4.tcp_congestion_control net.core.default_qdisc

结果如下:

net.ipv4.tcp_congestion_control = bbr
net.core.default_qdisc = fq

如果不幸失败,可以通过VNC修改启动项到老的内核。

6步骤实现CentOS系统环境精简优化

随着VPS主机使用的深化,老左从开始使用面板工具操作VPS,再到后来的一键安装包,现在基本上能自学自用VPS管理网站/备份网站维护。但是需要深入的运维还需要时日,比如刚才看到一篇CentOS系统环境精简优化的文章还是值得分享的。但是在操作之前,最好建议在我们安装系统之后操作,而不要在有网站运行之后操作,以免系统出现问题。

随着VPS主机使用的深化,老左从开始使用面板工具操作VPS,再到后来的一键安装包,现在基本上能自学自用VPS管理网站/备份网站维护。但是需要深入的运维还需要时日,比如刚才看到一篇CentOS系统环境精简优化的文章还是值得分享的。但是在操作之前,最好建议在我们安装系统之后操作,而不要在有网站运行之后操作,以免系统出现问题。

第一步、删除不必要的自带软件包

yum remove Deployment_Guide-en-US finger cups-libs cups ypbind
yum remove bluez-libs desktop-file-utils ppp rp-pppoe wireless-tools irda-utils
yum remove sendmail* samba* talk-server finger-server bind* xinetd
yum remove nfs-utils nfs-utils-lib rdate fetchmail eject ksh mkbootdisk mtools
yum remove syslinux tcsh startup-notification talk apmd rmt dump setserial portmap yp-tools
yum groupremove "Mail Server" "Games and Entertainment" "X Window System" "X Software Development"
yum groupremove "Development Libraries" "Dialup Networking Support"
yum groupremove "Games and Entertainment" "Sound and Video" "Graphics" "Editors"
yum groupremove "Text-based Internet" "GNOME Desktop Environment" "GNOME Software Development"

第二步、升级centos系统

yum update #更新系统
yum clean all #清理全部缓存文件

第三步、禁用seLinux

sestatus #先执行看seLinux状态,如果不是disabled,就需要执行下面步骤,否则不要执行
vi /etc/selinux/config
SELINUX=disabled #禁用SeLinux
SELINUX=enforcing #使用SeLinux

第四步、禁止IPV6(执行后需要reboot重启)

vi /etc/modprobe.conf #打开文件,把下面两行加到最后
alias net-pf-10 off
alias ipv6 off

第五步、初始化防火墙

touch /etc/sysconfig/iptables
iptables -F
iptables -X
iptables -Z
service iptables save
service iptables restart

第六步、禁止无用服务

#! /bin/bash
service acpid off
service atd stop
service auditd stop
service avahi-daemon stop
service avahi-dnsconfd stop
service bluetooth stop
service conman stop
service cpuspeed stop
service cups stop
service dnsmasq stop
service dund stop
service firstboot stop
service hidd stop
service httpd stop
service ibmasm stop
service ip6tables stop
service irda stop
service kdump stop
service lm_sensors stop
service mcstrans stop
service messagebus stop
service microcode_ctl stop
service netconsole stop
service netfs stop
service netplugd stop
service nfs stop
service nfslock stop
service nscd stop
service ntpd stop
service oddjobd stop
service pand stop
service pcscd stop
service portmap stop
service psacct stop
service rdisc stop
service restorecond stop
service rpcgssd stop
service rpcidmapd stop
service rpcsvcgssd stop
service saslauthd stop
service sendmail stop
service setroubleshoot stop
service smb stop
service vncserver stop
service winbind stop
service wpa_supplicant stop
service xfs stop
service ypbind stop
service yum-updatesd stop
chkconfig acpid off
chkconfig atd off
chkconfig auditd off
chkconfig avahi-daemon off
chkconfig avahi-dnsconfd off
chkconfig bluetooth off
chkconfig conman off
chkconfig cpuspeed off
chkconfig cups off
chkconfig dnsmasq off
chkconfig dund off
chkconfig firstboot off
chkconfig hidd off
chkconfig httpd off
chkconfig ibmasm off
chkconfig ip6tables off
chkconfig irda off
chkconfig kdump off
chkconfig lm_sensors off
chkconfig mcstrans off
chkconfig messagebus off
chkconfig microcode_ctl off
chkconfig netconsole off
chkconfig netfs off
chkconfig netplugd off
chkconfig nfs off
chkconfig nfslock off
chkconfig nscd off
chkconfig ntpd off
chkconfig oddjobd off
chkconfig pand off
chkconfig pcscd off
chkconfig portmap off
chkconfig psacct off
chkconfig rdisc off
chkconfig restorecond off
chkconfig rpcgssd off
chkconfig rpcidmapd off
chkconfig rpcsvcgssd off
chkconfig saslauthd off
chkconfig sendmail off
chkconfig setroubleshoot off
chkconfig smb off
chkconfig vncserver off
chkconfig winbind off
chkconfig wpa_supplicant off
chkconfig xfs off
chkconfig ypbind off
chkconfig yum-updatesd off

这样通过上述6步骤,就可以完成对centos精简和优化。

CentOS使用NFS共享目录

一、服务端安装NFS服务

  • 1、安装所需软件包
yum install nfs-utils
  • 2、启用服务
systemctl enable nfs-server 
systemctl start nfs-server
  • 3、设置需要被共享的目录,编辑/etc/exports(vi /etc/exports),添加下面一行(/data/dir是被共享的目录)
/data/dir 客户端IP(rw,sync,no_root_squash,no_all_squash)
  • 4、设置防火墙
firewall-cmd --permanent --zone=public --add-service=nfs
firewall-cmd --reload

二、客户端设置目录映射

  • 1、安装所需软件包
yum install nfs-utils
  • 2、创建挂载到的目录
mkdir /data/dir
  • 3、挂载
mount -t nfs 服务端IP:/data/dir /data/dir/

三、Enjoy!

CentOS 7安装proftpd并添加虚拟用户

最近需要在CentOS 7上配置proftpd,在防火墙设置方面费了点周折,花了半个多小时才全部搞好,特此记录。

  • 1、yum安装proftpd
yum install -y proftpd proftpd-utils
  • 2、修改配置,核心配置如下:
Port 21001 
PassivePorts 60000 65535 
DefaultRoot ~ 
AuthOrder mod_auth_file.c 
AuthUserFile /etc/proftpd.passwd 
AllowRetrieveRestart on 
AllowStoreRestart on 
RequireValidShell off
  • 3、添加虚拟用户
ftpasswd --file=/etc/proftpd.passwd --home=/data/xxx \ 
       --shell=/bin/false --name=www --uid=888 --gid=888 --passwd
  • 4、放行防火墙

服务端口:

firewall-cmd --zone=public --add-port=21001/tcp --permanent

数据端口:

firewall-cmd --zone=public --add-port=21000/tcp --permanent

PASV端口:

firewall-cmd --zone=public --add-port=60000-65535/tcp --permanent

重新加载:

firewall-cmd --reload
  • 5、重启服务
systemctl restart proftpd

CentOS 7 安装MySQL 5.7

听闻MySQL5.7较之前的版本有重大性能提升,打算安装试试,网上找的教程大多过于繁琐,另外对于默认密码更是鲜有提示,所以撰文一篇,简要记录安装过程。

  • 1、安装MySQL官方yum源
rpm -Uvh http://dev.mysql.com/get/mysql57-community-release-el7-7.noarch.rpm

来源:http://dev.mysql.com/downloads/repo/yum/

  • 2、yum安装MySQL
yum install -y mysql-community-server

这一步会自动替换本机安装的MariaDB

  • 3、启用MySQL并启动MySQL
systemctl enable mysqld
systemctl start mysqld

首次启动MySQL的时候系统会进行初始化,包括设置初始密码

  • 4、获取MySQL初始密码
grep "A temporary password is generated” /var/log/mysqld.log

root@localhost:后面就是初始密码

  • 5、修改MySQL密码并进行简单安全设置
mysql_secure_installation

首先输入初始密码,然后可以选择修改密码,必须同时包含大小写数字和特殊字符;然后基本上全部输入Y回车即可。

  • 6、测试MySQL连接
mysql -uroot -p

此处输入上一步设置的密码

  • 7、Enjoy!

VPS通过SSH、Grub和VNC无盘安装CentOS7

1、下载initrd.img、vmlinuz到/boot目录

cd /boot
wget http://mirrors.usc.edu/pub/linux/distributions/centos/7.2.1511/os/x86_64/images/pxeboot/initrd.img -O initrd-7.img
wget http://mirrors.usc.edu/pub/linux/distributions/centos/7.2.1511/os/x86_64/images/pxeboot/vmlinuz vmlinuz-7

2、保存好机器的IP、子网掩码(netmask)、网关(gateway)、DNS信息
3、修改/etc/grub2/grub.cfg
在### BEGIN /etc/grub.d/10_linux ###下面新增

menuentry 'CentOS 7 VNC' {
	linux16 /boot/vmlinuz-7 vnc vncpassword=abcd1234 ip=IP netmask=子网掩码 gateway=默认网关 dns=8.8.4.4 ksdevice=eth0 method=http://mirrors.usc.edu/pub/linux/distributions/centos/7.2.1511/os/x86_64/ lang=en_US keymap=us
	initrd16 /boot/initrd-7.img
}

4、连接好VNC,笔者使用的是Mac下的Chicken,方法不赘述
5、重启VPS,并且密切关注VNC窗口,等到重启时快速按上下方向键,直到停留在grub界面

reboot

6、在grub界面,选中CentOS 7 VNC,回车

7、等到界面提示连接VNC时连接,进行正常安装
IP:VPS的IP
端口:1或者5901
密码:abcd123456
8、Enjoy!

PS:内存太小可能不会成功